|
|
|
Kto jest w sklepie?
Sklep przegląda 5869 gości |
|
Kategorie
|
|
Informacje
|
|
Polecamy
|
|
|
 |
|
|
Dla tego produktu nie napisano jeszcze recenzji!
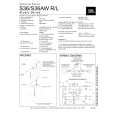
SPEAKER PLACEMENT
Proper placement of the speakers is an important step in obtaining the most realistic soundstage possible. These recommendations are for the optimum placement of the loudspeakers. Use these placement recommendations as a guide. Slight variations will not diminish your listening pleasure. The Studio Series S36 loudspeakers are videoshielded and can safely be placed near a television. Although these loudspeakers are designed as a mirrored pair, the decision as to which one is left or right will depend on the amount of space left between them.
Installation of Self-Adhesive Rubber Pads: If the S36 is to be placed on a surface (such as a table top or shelf) rather than being wallmounted, the enclosed selfadhesive rubber pads are to be attached to the bottom of the speaker cabinet in their designated recessed locations. If the S36 is to be wallmounted, then the four selfadhesive rubber pads should be attached to the back of
the speaker, as shown in the bottom right diagram. The S36 can also be used on floor stands. Please see your JBL dealer for more information.
PADS GO HERE
For tabletop or shelf placement
PLACE RUBBER PADS HERE
For stereo-only applications:
Less than 6 � 8 feet
More than 6 � 8 feet
A wider stereo image is presented with the tweeter/midrange array outboard, and a tighter image is presented with the array inboard.
KEYHOLES FOR MOUNTING HARDWARE
For wall-mounting
SPEAKER CONNECTIONS
CONNECTION TIPS
speakers identically: (+) on the speaker to (+) on the amplifier and (�) on the speaker to (�) on the amplifier. Wiring �out of phase� results in thin sound, weak bass and a poor stereo image. With the advent of multichannel surround sound systems, connecting all of the speakers in your system with the correct polarity
�
RIGHT LEFT
For home-theater applications:
0-2 ft.
This placement provides a wide spread in sound, supplemented by the center-channel speaker.
+ �+ � +
�
+
Speaker Outputs
The S36 loudspeakers may be positioned on the wall either horizontally or vertically. The grille logo on each speaker may be rotated depending on how the speaker is positioned. Gently pull the logo away from the grille slightly, rotate it to the desired
position, and let go. The logo will snap back into place. When mounted vertically, the tweeter array may be positioned either up or down, depending on the height of the placement. If the speakers will be above ear level, the tweeter array
should be positioned down, preferably no more than two feet above ear level. If the speakers will be mounted very low, it may be best to position the tweeter array upward so that it will be no more than two feet below ear level.
Speakers and electronics terminals have corresponding (+) and (�) terminals. It is important to connect both
remains equally important in order to preserve the proper ambience and directionality of the program material.
TROUBLESHOOTING
If there is no sound from any of the speakers: � Check that receiver/ amplifier is on and that � Make sure all wires are connected. Make sure none of the speaker wires are frayed, cut or punctured. � If more than one pair of main speakers is being used, check the minimum impedance requirements of your receiver/amplifier. If there is no sound coming from one speaker: � Check the �Balance� control on your receiver/ amplifier. � Check all wires and connections between receiver/amplifier and speakers. � Make sure all wires are connected. Make sure none of the speaker wires are frayed, cut or punctured.
WALL-MOUNTING
The Studio Series S36 loudspeakers may be wallmounted as either front or rear speakers, horizontally or vertically. The S36 enclosures are specially designed to angle the speakers toward the listener when mounted flush against the wall. A template sheet is provided to aid in drilling mounting holes needed for the 4 keyholes on the back of the S36. Always use all 4 keyholes, and try to place at least 2 of the 4 screws into a wooden wall stud. Size 10 screws of at least 1-1/2" in length are recommended. If the screws are used in drywall or other surfaces incapable of holding the screw by itself, selection of proper anchors is essential. The customer is solely responsible for proper selection and installation of screws, anchors and other installation hardware. Further installation details are included on the installation template.
a source is playing. � Review proper operation of your receiver/amplifier. � Make sure all wires are connected. Make sure none of the speaker wires are frayed, cut or punctured. If the system plays at low volumes but shuts off as volume is increased: � Check all wires and connections between receiver/ amplifier and speakers.
Declaration of Conformity
We, Harman Consumer International 2, route de Tours 72500 Chateau-du-Loir France declare in own responsibility, that the loudspeaker
described in this owner�s manual is in compliance with technical standards: EN 50081-1:1992 EN 50082-1:1992
TV
Steen Michaelsen Harman Consumer International France. 5/00
|
|
|
> |
|